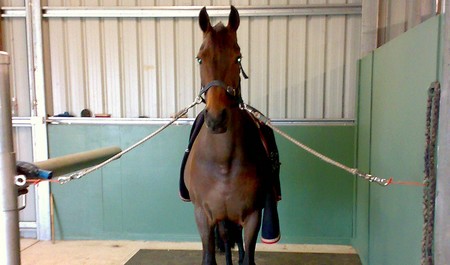
Before we can put a horse on the cross-ties and expect him to stand quietly, it’s helpful to teach him to stand quietly without being tied. Choose an area where your horse is comfortable and unlikely to be distracted. You may want to use a halter and lead rope for this work, although you won’t use them as “correction” tools. They just make it easier to catch your horse if he wanders away.
First, come up with a cue that you want to use to ask him to stay. I put both hands on one side of the horse’s shoulder and barrel and say the word “stay.” I then back away from his side and walk to his rear so it’s easy for him to understand the difference between walking with me at his head and staying still with me behind him. Whatever you choose, make sure your cue is clearly different from any other. Stand at your horse’s side with one foot slightly behind the other. Give the cue and move back from your horse’s side, preferably the left side, by just shifting your body weight to the back foot. If he allows you to do this and remains where he is, bridge and reinforce. This is the first small goal toward the larger goal. Next, give your cue again and take a half step further back. If he responds correctly, click and feed. If he responds incorrectly, go back to your cue, such as placing your hands on his barrel and shoulder. If he remains still during your smallest movement away from him, bridge and reinforce. Continue to build on this process until he lets you walk around him. The benchmark I would suggest for this exercise is that he may not move his feet. I don’t mind if he moves his head. However, it may be important to you that he holds his head still for an upcoming conformation class to give you one example. Reinforce the behavior you want to be repeated.

Once your horse understands the cue to stay, take him somewhere different, perhaps to the area where you plan to teach him to tie or cross-tie. To set him up to succeed with this behavior, you can begin working with him at a time of day he’ll be most relaxed and most likely to stand still, perhaps after he has been turned out, hand-walked, or ridden. If you tried this first thing in the morning when he was expecting to go out with his friends who were just turned out, he could be restless or agitated. It’s better to pick a time when you will have the most success. Later in the training program, you’ll be able to work this behavior anytime and anywhere, ‘lb begin though, you need to give yourself the chance to build up his reinforcement-history. If your horse walks away, ask him to target on your hand, or on a hand-held target. Then, move to his side and ask him to stay. Continue to bridge the incremental behaviors that lead toward the desired goal of standing still. Just as you did previously, build up until he is performing up to the standard you’ve set.
Once your horse stands quietly when asked and understands he should give in to the pressure of a lead rope, he’s ready to learn about tying. Be sure to begin in a safe place with good footing. Avoid slippery-surfaces. For added safety, I recommend using cross-ties that “give” or can be released quickly if a horse panics. With the lead rope still attached, hook the cross-tics to the halter. As soon as you do, place the target directly in front of him, close enough so that he can touch it without taking a step. When he touches it, click and feed. Continue to bridge and reinforce each successful touch of the target, even if he seems somewhat nervous at first. Also bridge and reinforce every sign of relaxation. Usually, a horse will try to test this new restraint. When this happens, introduce the target just in front of him to alleviate the pressure the ties put on his halter. (You don’t want to inadvertently teach him to lunge forward away from the pressure.) As soon as he gives in to the pressure, click and feed while he’s still on the cross-ties. Then detach the cross-ties from his halter. This is a case where you use removal-reinforcement as a training aid. It is not just the pressure from the cross-tics that goes away when your horse gives in, it’s the pressure of the whole situation that is removed, too.
Keep these initial sessions very short. However, if your horse is relaxed about being on the cross-tics, leave him on for longer increments asking him to stay with your cue and using the target to help him focus. He will concentrate on these familiar actions making his constraint on the cross-ties less of an issue.
In this training system, you allow your horse to make a decision giving him enough time to grow comfortable with a new situation. If, out of fear, your horse pulls back in panic, use gentle pressure on the lead rope to bring him forward again on the cross-ties. Do allow him some movement while cross-tied. He will relax more easily and this will go a long way toward building trust. Once your horse decides by himself to commit to a task that used to frighten him, he will perform it better, longer, and more readily than if he is forced into the same situation.

If your horse becomes very nervous, back up a step in the training process. Use the lead rope and target to get him focused. As soon as he settles even the slightest bit, unhook the cross-tics. Remember not to react strongly if he seems panicked. You can make him even more upset. Try to remain calm. Ask him to target and allow him a little more time to make a correct decision. I le may perceive this situation as life-threatening and react accordingly. If so, he needs more time and patience to learn and trust that being on cross-ties is not threatening to him. You may need to start all over again and just use one cross-tic at first. You may even have to feed him when he allows the cross-tics near his halter without reacting. When you attach one cross-tie, bridge and reinforce when you can clip it on him without a fuss. Then, with plenty of slack in the cross-tie, ask him to target with his head toward the other cross-tie. This will put a slight amount of pressure on the cross-tie that’s attached to his halter. Bridge and reinforce him for allowing this. Feed him with the cross-tie attached and end the session. Build on this beginning until you can replicate the sensation of being cross-tied on both sides using the lead rope as one of the cross-ties, building up this exercise until he stands quietly this way for a few minutes. The advantage to working with the lead rope acting as one of the cross-ties is that you can quickly release it if he panics. When he is coping with this well and seems comfortable, attach the other cross-tie. When attaching the second cross-tie, you raise the criteria, so remember to make things quick and easy for him again.
If your horse is brand new to cross-ties and reacts adversely, more than likely he is simply worried about his lack of freedom for flight. Over time, he will learn that he doesn’t need to flee. However, an older, trained horse who panics in the cross-ties has usually had an unpleasant experience with them. You need to make it enjoyable. So if possible, put him on the cross-ties and feed him his dinner. This will do wonders for his confidence, for now, I suggest that while he is cross-tied, avoid doing things your horse doesn’t like. Instead, hold him yourself with a lead rope for the vet or for clipping. Once he is completely comfortable with these procedures, then move him to the cross-ties. You should never ask your horse to do something while cross-tied that he is not comfortable doing just standing. This policy will help avoid further cross-tie problems and dangerous situations. You may train behaviors while your horse is cross-tied, but start with very small steps and keep the time frame brief. Building the behaviors slowly while he is cross-tied will keep your horse’s comfort-level high and will develop a desirable reinforcement-history.