WHEN TO SOW
Sowing time needs to be related to local conditions, the weather, the state of the soil and to the crop concerned. Some seeds are best sown in spring and others in late summer; but when it comes to the likes of salads and quick maturing vegetables, they are sown at regular intervals throughout the growing season to keep up a succession of produce.
SEEDS
Buy fresh seed of varieties known to do well locally. Check that they are suitable for the season and method of cropping. For instance, keep to outdoor varieties for growing in the open and never try to use indoor kinds.

Standard varieties are suitable for most purposes, as they give reliable average crops of reasonable quality. F1 hybrids are generally more uniform and vigorous than standard varieties, but they cost more. Mid-way in cost and performance come the F2 hybrids.
Untreated seeds are still the most widely used, but for ease of handling some gardeners turn to pelleted seeds which are coated with fertilizer and fungicide. Others push in ‘sticks’ — these seeds are sold in packets, rather like tear off matches.
Note
If seed cannot be sown right away, keep it cool at about 5°C (40°F), in a shaded, dry spot protected from vermin. Don’t open the packet until the last moment, to prevent moisture and disease organisms gaining entry. Immediately after sowing, protect any surplus seed by reseating the packet and returning it to cool, dry, shady conditions.
PRE-SOWING PREPARATIONS
Avoid sowing in shaded areas under the drips of trees; on ground which has carried a similar, or closely related, type of plant within the previous two years.
Take account of the season
It is sowings made early and late in the season which present the greatest difficulties, so give these crops priority for favoured, sunny, sheltered spots. In spring, about a fortnight before the earliest sowings are envisaged, aim to cover the soil with cloches, to help it dry out and warm up. Then after sowing, protect the seeds with cloches. Where this is not feasible, delay sowings until things warm up a bit.
Soil preparations
Once the time is right for sowing, and assuming the soil has been well prepared, you can set about final preparations. Break up any remaining hard clods with the back of a solid tine rake (alternatively, use a cultivator). Then firm the soil, if it is inclined to be puffy, by treading heel to toe. Never try to force the pace by working the soil when it is wet. Apply general fertilizer like Growmore at the rate of a small handful per sqm (yd). Finally, using the rake comb fashion, work the seed bed down to a fine crumbly tilth, always working backwards to avoid walking on the raked area.
Seed treatment
Most flower and vegetable seeds are sown without any special treatment. But follow the instructions on the seed packet as peas, for example, are best soaked.
SEED SOWING
Drill sowing
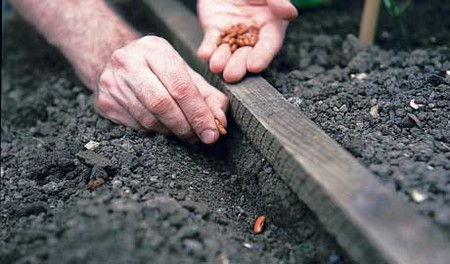
The ‘V’ drill is practical for sowing small and medium-sized seeds. It is extensively used, both when sowing to harvest or flower in situ, and when sowing in a nursery bed to raise young plants in readiness for transplanting. A shallow furrow is scratched out alongside a taut line, using a draw hoe or the back of a rake. Relate furrow depth to size of seed; a good rule of thumb guide is to set untreated seed at a depth equal to three times its diameter, and make it twice in the case of pelleted seeds. If the soil is dry, water the bottom of the drill, using a can with rose, and allow the water to seep in before sowing. Pour small and medium-sized seeds into the palm of your hand and then, using forefinger and thumb, sow a pinch at a time, working systematically along the row. For those who prefer seed dispensers, there are various suitable models available.
Larger seeds and pelleted seeds are spaced out individually. After sowing, gently draw loose soil over the seeds with a rake. Then lightly tamp, using the back of the rake with the handle held vertically, to firm the soil.
The flat-bottomed drill
Flat-bottomed drills are useful for sowing large seeds like peas. Using a spade or draw hoe, take out a drill of about 5 cm (2 in) deep and 12.5 cm (5 in) wide. Seeds are scattered evenly and thinly over the base and then covered over, as for the ‘V drills.
Exceptional circumstances
In cold wet districts on heavy soils it is best to draw up slight ridges of about 20-30 cm (8—12 in) in width and 10—12.5 cm (4—5 in) in height. Drills are then taken out along the top of the ridge and the surface water is able to drain away more freely. There are few vegetable crops which don’t benefit from this treatment. Conversely, in dry areas on quick draining soils, take out drills in the bottom of shallow trenches, so trapping and making use of any surface run-off water.
Station sowing
Large seeds like broad beans and pelleted seeds can be sown singly in rows, without taking out drills. Use a blunt-ended dibber to make each hole or ‘station’. This is also a satisfactory way of sowing the likes of parsnips, sweet peas and marrows, but here two or three seeds are sown at each station and then the seedlings are later thinned to leave the strongest. The chief thing to watch with station sowing is that the seeds are not sown too deeply.

Surface sowing
Some fine seeds are simply scattered on the surface of the soil and then barely covered with potting compost. Flower seeds like foxgloves and forget-me-nots are treated in this fashion. Fine mesh netting, laid over surface sown seeds and pegged down in place, helps to ensure more rapid germination and gives added protection against heavy rain and birds. Remove the netting as soon as the seeds germinate.
AFTER SOWING
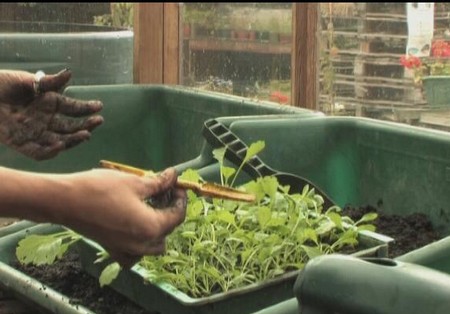
Mark and label all sown seeds and the area they occupy. This is so the young seedlings can be more easily distinguished from weeds later on. Keep the seeds moist until there are signs of movement, watering daily if need be, although ease up on watering once the first true leaves develop (to encourage plants to make deeper roots and so be better able to withstand drought in the future). When seedlings reach about 3 cm (1 in) in height they are ready for thinning, to leave plants standing singly. Follow the instructions on the seed packet for spacings.
STEM CUTTINGS
Stem cuttings are one of the most practical and popular ways of raising plants. But the way these cuttings are taken and subsequently treated must be varied to suit the plant in question and be linked to the time of year and the state of the ‘wood’. However, there is a degree of flexibility. Some cuttings will root readily when taken at both the soft and semi-hardwood stage — and others when taken at the semi-hardwood or hardwood.
Only ever take cuttings from plants which are vigorous and healthy. Some diseases are transmitted from one generation to the next, and cuttings taken from stunted or starved plants are usually reluctant to root and invariably prove to be a waste of time. Finally, only consider taking cuttings from plants worthy of duplication – bad as well as good features will be passed on.
SOFT AND SEMI-HARDWOOD CUTTINGS
General guidelines
- Take cuttings from shoots which are not carrying flowers or flower buds.
- Take cuttings early in the day when they are most likely to be fully charged with water.
- Use a sharp knife or secateurs to remove the cuttings from the plant, and a sharp razor blade for the final trimming.
- To prevent cuttings wilting before they have been potted up, drop them into a plastic bag and seal.
- Prepare small pots of proprietary cutting compost in advance. This is so that there is as little delay as possible between taking the cuttings and potting them.
- Although not essential, proprietary rooting preparations can help to prevent rotting and speed up rooting. But do read the label and use the one intended for the particular type of cutting in hand.
- Dip cuttings with milky sap into charcoal before potting.
- Using the blunt end of a pencil to make small dibber holes before inserting three or four cuttings around the edges of small pots of cutting compost. Set them to no more than a third their length and take care not to bury the leaves to avoid any risk of rotting.
- In the absence of a garden propagator, encase the entire pot of cuttings in an inflated clear, perforated plastic bag, held in place with an elastic band. This is to maintain high levels of humidity; in addition, spray the cuttings regularly with tepid water.
- Cuttings root well on a warm indoor sill in good light, shaded from strong sun. But the bottom heat provided by a propagator or seed tray soil warmer will speed things up.
- After rooting pot up the young plants. But before they can be planted outside they must be gradually acclimatized to outdoor conditions if they are not to suffer a setback and irreparable damage. This is often referred to as hardening off. Put the young plants outside for a few hours each day. And then gradually increase the amount of time they spend outdoors until eventually they can stay outside in safety overnight. Allow two or three weeks for hardening off.
Soft stem cuttings are taken from the tips of shoots which have not yet begun to harden. This is a useful way to increase plants with succulent stems, including perennial bedding plants such as geranium, busy lizzies, heliotrope and calceolarias; herbaceous border perennials; soft stemmed rock plants; as well as sub-shrubs.
This type of cutting is taken any time between early spring and summer. Select a firm young shoot and avoid those which are soft, thick and over sappy, along with any that are weak and spindly. Aim for a cutting of 2.5—7.5 cm (1—3 in) in length after trimming; it must include a minimum of two leaf joints.
Trim the cutting cleanly and squarely, just below the bottom leafjoint. Strip away the lower pair of leaves and insert in cutting compost. Note Geraniums are an exception. They should be allowed to wilt slightly overnight before insertion in cutting compost.
Semi-hardwood cuttings can be taken from a whole range of shrubby plants — pretty well anything in the garden is worth a try. Take the cuttings in summer as soon as young growths have partially ripened and begun to harden. Select terminal shoots and cut well into the hardened wood. After trimming cuttings should be 10 – 15 cm (4 – 6 in) in length.
The standard method
Basically treat as for the soft stem cuttings. However, one essential difference is that the soft tip should be cut out, just above the top pair of leaves.
Heel cuttings
Pull a sideshoot downwards from a main stem so that a sliver of main stem remains attached to the base of the cutting. This is known as the ‘heel’. Trim to neaten any straggly tails on the heel. Cut out the soft tip. And then proceed as for the soft stem cuttings.
HARDWOOD CUTTINGS
Hardwood cuttings represent a reliable way to increase a whole range of hardy shrubs, including favourites like weigela, forsythia and escallonia — as well as fruits like currants and gooseberries.
The best time to take hardwood cuttings is mid-autumn, just as the leaves fall with deciduous kinds. Not only is the wood ripe at this time, but the soil is still warm enough to give them a good start. They are usually rooted in a sheltered spot outdoors.
Select shoots from vigorous, sound stems which have just finished their first year’s growth. They should be well ripened and firm. Cut the shoots out with secateurs, near to the joint with the main stem. Alternatively, take the cuttings with a ‘heel’. Either way, trim as for the semi-hardwood cuttings, ending up with a cutting of 20 – 30 cm (8 – 12 in) in length.
When dealing with cuttings from deciduous shrubs, remove any remaining leaves. With evergreens, trim to just below a leaf at the base and to just above a leaf at the top. And then remove the leaves from the lower half. When dealing with large-leaved evergreens, cut the leaves crosswise, cleanly in half. This helps rooting by reducing the loss of moisture and subsequent strain. Mexican orange, laurel and evergreen hydrangea all respond to this treatment. In a similar vein, spray evergreens with a proprietary anti-wilt preparation to cut down moisture loss and speed up rooting.

Prepare the bed for rooting prior to taking the cuttings. Select a sheltered spot, protected from north and east winds. It is important to prepare the soil thoroughly, working in plenty of sand if it is inclined to be heavy. Make a series of dibber holes about 15 cm (6 in) deep and about 10 cm (4 in) apart. Bottom them out with coarse sand. Insert a prepared cutting into each hole, firming the soil well around the cutting and ensuring its base makes close contact with the sand.
From here on, don’t allow the cuttings to dry out at any time. Keep them weed free and stir the soil crust from time to time. Refirra the cuttings after frost or wind; the base must always be kept in close contact with the sandy soil.
Cuttings vary considerably in the time they take to root, but one or two years is the norm. Move them into their permanent positions when well rooted and growing away freely.