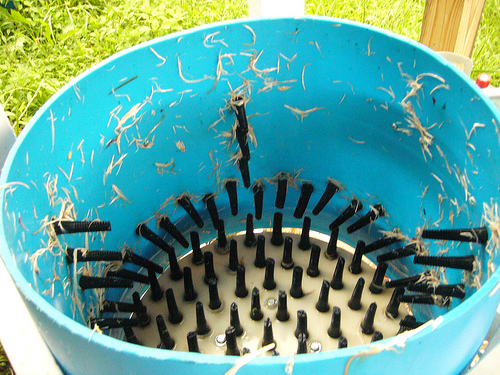
Time is gold for the “flockster” and traditional hand plucking probably consumes the most of his time at the worktable, thus the need for mechanical assistance taking the feathers off the fowls being processed. A homemade chicken plucker is the answer to his problem. However, building one may require great patience and manual dexterity and may occasionally result in some unexpected mechanical glitches. Plus, the materials for the equipment may cost up to $800. Nevertheless this one machine is definitely a much more economical substitute for a commercial tub plucker which may approach $2,000
Things you’ll need:
- Lumber: 2x4s, 2x6s (for wooden frame)
- Heavy bolts (for wooden frame)
- 2 Bore Pillow Block Bearings, 1” each (for mounting plate)
- Stock pipe, 1″ round, 4 foot-long (for shaft)
- Sheet steel, 1/8″ thick (for feather plate)
- Drill press
- Electric Motor, 3/4 HP Capacitor-start
- Electrical Materials including Switch, Weathertite box and Romex cable
- Electrical wire and wire staples (for electrical materials)
- Plastic barrel (for tub cylinder)
- 150 Rubber Plucker Fingers, 1” wide by 5”long each
- Main Driven Pulley, 15.25″ with 1″
- Drive Pulley, 2.5″ outside diameter x 5/8″ bore
- 2 Wheels, 10″ diameter each
- Completely scalded chicken (for the trial run)

Instructions:
- Assemble a strong wooden frame using construction grade lumber and heavy bolts. Make sure that this frame should be able to hold the tub cylinder in Step 7. (see How to Build a Chicken Plucker 1.jpg).
- Align the pillow block bearings precisely at the bottom of the frame, in order to prevent the shaft (see Step 3) from wobbling when it spins. The pillow block bearings will serve as the mounting plate.
- Weld the shaft exactly perpendicular to the mounting plate (see How to Build a Chicken Plucker 2.jpg).
- Make sure that the shaft and the struts to which the pillow block bearings are attached are perfectly aligned.
- Build the rotating featherplate out of a piece of 1/8 inch sheet steel. Shape this metal disk to a perfect round. After which, lay out and drill the holes for the plucker fingers using a drill press.
- Mount the 3/4 HP motor to one of the four corners of the frame and wire this motor to a weather-tight switch in order to prevent splashing water from causing electrical hazard.
- Cut away the bottom part of the plastic drum to serve as the tub cylinder.
- Drill 3/4-inch holes in the drum sides.
- Insert the tapered rubber plucker fingers from the outside and pull them until their grooved bases interlock with the plastic edges of the holes.
- 10. Arrange the plucker fingers on the steel bottom plate and set the shaft in place (see How to Build a Chicken Plucker 3.jpg).
- 11. Attach onto one of the sides of the frame the pulley that will turn the drive shaft (see How to Build a Chicken Plucker 4.jpg).
- 12. Have a trial run for this using a completely scalded chicken.
Tips:
- In Step 4, you may also hire a welder to do the job or you may purchase this completed item.
- In Step 5, you may also build the rotating “featherplate” at the bottom of the tub from plywood. You may also want to cover this later with sheet metal, to make the plywood last longer.
- In Step 5, you may also decide to purchase a high-quality HDPE sheets (high density) featherplate, already attached to the shaft and mounting plate.
- In Step 6, you may install a plastic shield over the motor itself to protect it from splashing water.
- In Step 7, another good choice for the side of the tub is a sheet of HDPE plastic, 1/8″ thick. Bolt the ends of the sheet together to form a cylinder.
- In Step 12, you may use an automatic spray system over the chicken plucker in order to flush away the feathers as they’re being removed by the plucker fingers.
Warnings:
- When doing Step 10, ensure that the small gap between the steel disk and the bottom edge of the plastic drum. The size of this gap is very critical in the whole process, and it must not be made unnecessarily wide.
- When doing Step 11, keep in mind that it is only the shaft and the attached featherplate that rotate. The sides of the tub cylinder remain stationary.